Introduction
One of my goals in life is to influence my grandchildren to draw. The best way for me to accomplish this is to draw; to be the example. And in this day and age I can make little movies so that they can "watch" me draw.
I organized my 100 Days of Drawing to teach the following:
- basic drawing techniques (Source: You Can Draw in 30 Days by Mark Kistler).
- drawing cartoons (Reference: Draw Manga Animals, Chibis, and Other Adorable Creatures by J C Amberlyn)
- the elements of art:
- Line
- Shape
- Value
- Form
- Space
- Color
- Texture
- drawing humans
- the principles of art:
- Balance
- Emphasis
- Movement
- Proportion
- Rhythm
- Unity
- Variety
The target of these 100 days is to learn tricks and techniques to draw, first using our imagination and then from life.
This week's drawings
For our first week we'll have our imagination play with circles, balls, cubes, boxes and cuteness:
Materials:
- pencil
- eraser
- paper (printer paper, notebook, etc)
- pen
- colors (colored pencils, crayons, watercolor, etc)
- alternatives to the above: smart phone or tablet drawing app
Day 1: draw a circle.
Use a vertical and horizontal line to help.
Play with it. Turn it into a smile. Color it, turn it on!
A circle is flat. In art, flat objects are called shapes.
Play some more. Turn it into a boulder. Put some other round rocks near by.
If you pretend that your circle is three dimensional and shade it to look three dimensional, you'll have a sphere. In art, three dimensional objects are called forms. In You Can Draw in 30 Days: Day 1 Mark demonstrates shading a circle to make a sphere.
Play some more. Circles are fun! We can use them to make all kinds of shapes and forms.
Here is a video of my drawing (best viewed fullscreen):
Day 2: draw overlapping circles
A way to create the illusion of form is to shade your shapes away from the light source. Also, adding shadows in the direction away from the light source creates the illusion of space.
This is a continuation of the boulders that I drew as part of Day 1's drawing.
Here's the link to You Can Draw in 30 Days: Day 2 where Mark Kistler demonstrates drawing overlapping circles.
Here is a video of my drawing (best viewed fullscreen):
Day 3: advanced-level spheres
This drawing took me a while to complete. I suggest making the balls bigger, drawing less of them, and having fun turning them into something else.
Establish a light source (I indicate my light source with the arrow in the upper right). Add shade to each round shape to make it look like a ball.
Mark Kistler addresses advanced-level spheres in You Can Draw in 30 Days: Day 3. He starts giving us a peek at perspective by introducing the horizon in his drawing.
Here is a video of my drawing (best viewed fullscreen):
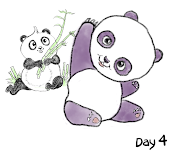
Day 4: draw a Panda or two

Circles can be used to draw lots of things, especially faces. Here we use a big circle for the head and smaller circles for the black eye patches that pandas have and still smaller circles for the eyes, the pupils in the eye, and the highlight in the pupil.
I used a square to help me with the shape of the body. This helped me locate the arms and legs.
Here is a video of my drawing (best viewed fullscreen):
Day 5: draw cute Manga faces
I'm using Drawing manga : animals, chibis, and other adorable creatures by J C Amberlyn. A copy is available on the Internet Archives. J C gives step-by-step instructions to draw a chibi head on page 14.
To give another perspective on drawing "cute", Genevieve's Design Studio has posted How to Draw Cartoon Faces which in addition to demonstrating drawing cartoon faces provides a good introduction to using a drawing app (Procreate).
Here is a video of my drawing (best viewed fullscreen):
Day 6: draw a Chibi
Chibi comes from the Japanese chibi kyara which means "tiny character". The proportions for chibi are normally between two and three heads high, their heads are usually round with large manga eyes, and the details of the legs and arms are minimized. As a result, the cuteness associated with the big-eyed chibi face is reflected by the size of the chibi's body. One of the best examples of the chibi style is Hello Kitty.
Chibibyjean provides a tutorial showing How to Draw Chibi Character on Your iPad.
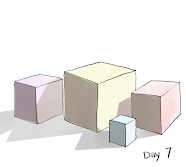
Day 7: draw a cube
 In a way, all the marks that we make are either a curved line or a straight line. The circle is a wonderful way for us to start playing with curved lines. Likewise the cube provides us a playground for straight lines. When I think of cubes, manmade objects come to mind: houses, buildings, trucks, boxes, buses. An extension of the cube is a box. An extension of the sphere is a tube. We'll be using boxes and tubes to help us sketch things we see and things that we imagine.
In You Can Draw in 30 Days: Day 4 Mark Kistler gives step by step instructions for drawing cubes.
Day 8: hollow cubes
Here we are at end of the first week, and it's boxing day. Since I started off telling you that we would be drawing cubes AND boxes, I had to extend the week, thus the 8th day of the week.
Looking back I enjoyed doing these drawings but have to admit that Day 3 was a bit tedious. I think it would have been more fun to draw circles on the imaginary 'Great Plain' and tried various techniques to make them into balls.
I included a chibi. They make doing the drawing more fun. Although I said we were learning tricks to draw from imagination, I use photos to help. In this case I borrowed Ray Zhuang's gray and white cat and exaggerated the eyes to add "cuteness".
Attached below is the Procreate video of my drawing. For step-by-step instructions, go to page 52 of You Can Draw in 30 Days or watch Mark's video, Lesson 5: Hollow Cubes.


No comments:
Post a Comment