Wednesday, May 31, 2023

100 Days of drawing (week 8)

This week's drawings

Congratulations on your progress! You've passed the halfway point!

The first half has been aimed at learning how to draw from our imagination. We'll continue to do our imaginary drawings, but this week we'll start learning to draw from life by looking at the human nose. 

Here are this week's drawings:
  • Day 52: create a cartoon character
  • Day 53: a tower in two-point perspective.
  • Day 54: the human nose
  • Day 55: lettering in two-point perspective 
  • Day 56: the foot
  • Day 57: color: color wheel 
  • Day 58: texture: invented vs simulated 

 Materials:

  • pencil
  • eraser
  • paper (printer paper, notebook, etc)
  • colors (colored pencils, crayons, watercolor, etc)
  • alternatives to the above: smart phone or tablet drawing app

Day 52: create a cartoon character


I have been looking through the book Creating Characters with Personality by Tom Bancroft (introduced on Day 39) for how-to cartooning ideas. So if you would like some inspiration for your cartoon character, I suggest that you page through Creating Characters with Personality.

To develop a character, Tom suggests that we start with a circle and augment it using other basic shapes: ovals, triangles, and squares.

So that’s what I did.  

I have to admit that drawing a cartoon character is hard for me. So the Procreate video is a bit long, almost 2 minutes.


As we get further down the road, we’ll look at creating various views to make your character 3-D.

Day 53: a tower in two-point perspective


If you've done the previous perspective drawings, you know that the first step is to draw the horizon.  For the tower, we'll draw our horizon in the middle of the page.  Next, we draw our two vanishing points. Mark Kistler's step-by-step guide begins on page 185 of you can draw in 30 days. He proceeds to draw a box and then draws another box on the top and a third box at the bottom. He shows us how drawing the shadow using one of the vanishing points serves to anchor the tower to the ground.

He reviews our tower drawing using what he calls the Nine Fundamental Laws of Drawing (concepts that help us create our visual illusions):
  1. Foreshortening (HINT: If you look at a cube and notice that one vertical edge is shorter than another vertical edge, what does that tell you?)
  2. Placement (HINT: If an object is closer to you than another object where is it placed vertically on your drawing?)
  3. Size (HINT: What happens to an object if you move it away from you?)
  4. Overlap (HINT: What is a way that you can tell if one object is nearer to you than another object?)
  5. Shading (HINT: What does shading do?)
  6. Shadow (HINT: What does a shadow do?)
  7. Contour (HINT: The contour defines the shape of an object. Cross-contour lines help to create form.)
  8. Horizon (HINT: How is your drawing affected if there is no horizon?)
  9. Density (HINT: How do far away things appear different from near things?)
How do each of these work? How many do you know before you read Mark's review.

Ravi Jaiswar (a.k.a. #arttrap) demonstrates How to draw a building in two point perspective: Day 24 in his 16 minute video.

Here is my 1 minute video of my armadillo building:


Day 54: the human nose


Darlene Nguyen gives us step-by-step instructions on How to draw a nose from the front – 7 easy steps.

I like how she gives us a preview, tells us she breaks the nose into 3 shapes for drawing, lists the materials we'll need, and guides us through the drawing.

Proko has two videos that I recommend:


The wonderful thing about Proko’s videos is, like Darlene, he follows the age old principle for instruction:
  1. Tell them what you’re going to tell them (he organizes this into 3 pieces
    • simple nose box
    • anatomy of nose
    • advanced rendering of nose: break major -lanes into minor planes
  2. Tell them:
    • simple nose box has two side planes, a top plane, and a bottom
    • the anatomy of the nose is made up of 3 parts: 
      • bridge made of bone and cartilage; 
      • ball made of cartilage; and 
      • wings made of fatty tissue
    • minor planes broken into 3 parts for three-quarter view:
      • bridge has 2 top, 2 ridge and 2 side minor planes
      • ball has top, front, bottom, and 2 side minor planes
      • wings has top, 2 side, and bottom minor planes
  3. Show examples


Day 55: lettering in two-point perspective


Mark Kistler starts his two-point perspective drawing with the horizon and two vanishing points. He nexts blocks in the letters and proceeds to rough in guidelines for the third dimension. Mark's step by step instructions begin on page 211 of 
you can draw in 30 days.

Jescia Hopper shows you How to draw letters in two point perspective in her 9 minute video.


I

Day 56: the foot


Discover Manga Drawing 30 Easy Lessons For Drawing Guys And Girls by Mario Galea provides a page of example feet to draw.

Here is a video showing how to draw 9 views of the foot: How to Draw Feet from any Angle, Easily! by Fine Art-Tips (8 minutes, 670K views)


Day 57: color: color wheel


We've learned the primary colors, secondary colors, and tertiary colors. Let's organize them so that we can talk about color harmony. It seems that the best way to sort our colors for doing this is to make a color wheel.  

Let's put our colors so that each secondary color is between the two primary colors that are mixed together to make it. And we'll do the same with the tertiary colors, placing each between the primary color and the secondary color that are mixed together to make it.

If we do this, we'll end up with the color we started with. For example, if we start with red . . .

  • PRIMARY
    • SECONDARY
      • TERTIARY
  • Red
      • Red-Orange
    • Orange
      • Yellow-Orange
  • Yellow
      • Yellow-Green
    • Green
      • Blue Green
  • Blue
      • Blue-Violet
    • Violet
      • Red-Violet
  • Red

. . . we'll end with red.  So it makes sense to loop the ends together and make a wheel.

I’ve made color wheel for 3 mediums and I learned a lot. The colors I mixed didn’t match what I expected. For example, in my WATERCOLOR wheel I can’t see much difference between red and red-orange.

To make your wheel:
  1. Draw a circle.
  2. Draw a vertical line down the center of the circle
  3. Draw a horizontal across the center of the circle.
  4. Divide each segment (quarter circle) into 3 equal parts
  5. You now have 12 segments. Color each segment with a different color as listed above: Red, Red-Orange, Orange, Yellow-Orange, Yellow, etc. 
If you want a challenge, try making the color wheel using only the 3 primary colors and mixing them to make the other 9 colors.  The colors you mix might not be what you expect, but you’ll learn a lot doing them.

Day 58: texture: invented vs simulated


We have learned what texture in art means and the difference between actual texture and implied texture. Today we are going to learn the difference between invented texture and simulated texture.

Let's define simulated texture first: simulated texture is a convincing copy of an object's actual texture. Simulated texture is sometimes called trompe l'oeil (French for 'tricks the eye').

A good example of simulated texture is Albrecht Dürer's rendering of the rabbit's fur in his Young Hare watercolor.

Invented texture is texture not intended to represent textures found in real life. It is a texture created by the artist.  Zentangles are good examples of invented texture.

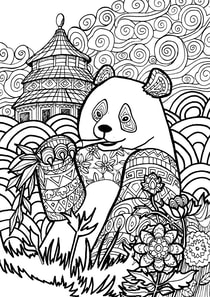
You would never see a panda covered with the invented designs in the accompanying drawing.

I'm asking you to do two drawings today:
  • draw an animal partly or wholly covered with invented texture.
  • draw simulated texture on an animal.

Friday, May 26, 2023

100 Days of Drawing (Week 7)

This week's drawings

In week 4 we had lessons for drawing the human body and head. This week we'll be drawing features of the human body:

Whether you enjoy drawing cartoons, doodling, making portraits, or creating fantasies, the time you spend learning to draw people will be time well spent.

We'll continue learning about perspective by drawing
  • Day 45: a city in one-point perspective and 
  • Day 47: a castle in two-point perspective.
In previous weeks we've explored primary and secondary colors.  This week we'll look at 
before we organize them next week into the color wheel.

For texture, this week we'll explore:

Materials:

  • pencil
  • eraser
  • paper (printer paper, notebook, etc)
  • pen
  • colors (colored pencils, crayons, watercolor, etc)
  • alternatives to the above: smart phone or tablet drawing app

Day 45: a city in one-point perspective


Mark Kistler shows us how to draw a "city" in one-point perspective beginning on page 179 of you can draw in 30 days. Using a pencil, you start by making a horizontal line near the middle of the page. This is your horizon and, you might note, its the origin of the term 'horizontal'.

Next you make a mark on the center of that line which is your vanishing point.

By making lines through the vanishing point you can create guidelines for your streets, buildings, vehicles, mailboxes, trashcans, and any other boxy object you want to put in your city. Mark talks about using a ruler to make these guidelines, noting that you can make the lines by hand. He makes the point that a ruler is just another tool that you can use or not use to make your drawing. I suggest that you try both ways as you explore using perspective.

Mark guides you through making box shapes and openings between them and in them to turn them into buildings.

You can watch Candy Brush build a city in 15 minutes in her video How to draw a city in one point perspective: Day 23. She places her horizon closer to the top of the page which places you, the viewer, at a higher elevation, able to see the tops of some of Candy's building.

How do you define ‘city’? I decided to go small, 19th century, and  western using tertiary colors. Here is the video:

\

Day 46: the human face


We did a lesson on the head in week 4 where you learned the Loomis Method. This week we dig a little deeper to look at the position of the features on the face. Portrait drawing basics (5 minutes, 65K views) by Steven Win (MyDrawingTutorials) gives you a great foundation for drawing your faces human-like. Steven starts with a 3 X 3.5 box around the head.  

The head is 3 and one-half units tall. The distance from the chin to the bottom of the nose is one unit. The distance from the bottom of the nose to the eyebrows is one unit. The distance from the eyebrows to the hairline is one l unit. From the hairline to the top of the head is 1/2 unit.

The eyes are located on the horizontal line at the halfway point between the chin and the top of the head. Each eye is one fifth the width of the head (minus the ears). 

The nose, it goes without saying, is located in the center of the face. The bottom is located one unit above the chin and is one unit long. It is one eye wide.

If you divide the space from the bottom of the nose to the chin by 3, the mouth is located the first third down from the bottom of the nose. The mouth mouth is almost as wide as the distance from the pupil of one eye to the pupil of the other eye.

In his book, you can draw in 30 days, Mark's approach to teaching the human face is based on tracing Leonardo da Vinci's Angel of the Madonna of the Rocks.

Florian Erb (a.k.a. Lazy Arts) has a 10 minute video, Face: Basic Proportions, that has some valuable drawing techniques:
  • notice how Florian holds his pencil when he's drawing circles.  It allows him to take advantage of his whole arm.
  • watch how Florian finds the halfway point on his circle's diameter and then the halfway points on the circle's radii.
  • see how he measure 3/4 of his circle to mark a point for his smaller circle.
  • notice how he locates the marks for the center and corners of the eyes.

Day 47: a castle in two-point perspective


Mark Kistler begins drawing a castle by drawing the horizon, establishing two vanishing points, and drawing a box.  He then walks us through drawing the turrets, the windows, the buttresses, and the doorway. His step-by-step instructions begin on page 193 of you can draw in 30 days.

Circle Line Art School's Draw a castle in two-point perspective: Day 25 shows how to draw the castle with a moat instead of buttresses, approach roads, bridges, and soldiers.

Here is the video of my drawing, using tertiary colors:


Day 48: the human eye


David Finch gives us a thorough training on the human eye. He starts with the eyeball, showing how to locate the pupil and iris. He then shows how the eyelids work and then how the eye fits into the skull. Finally he shows how the eye changes shape as we view it from various perspectives. His video, How to draw eyes, is 28 minutes long and very worthwhile.

Mark’s step-by-step of drawing the eye starts on page 227 of his book,  you can draw in 30 days


Day 49: hands


Hands are marvelous.  They are part of the Dynamic Duo: Hand and Eye. Training the Dynamic Duo to work with your imagination is our goal!

Mario Galea gives us examples of hands to draw in Discover Manga Drawing 30 Easy Lessons For Drawing Guys And Girls

Here are 3 videos showing how to draw hand:


Lesson 30 page 233 you can draw in 30 days 

Day 50: tertiary colors


Tertiary colors are made by combining a primary color and a secondary color:
  • red + orange => red-orange
  • orange + yellow => yellow-orange
  • yellow + green => yellow-green
  • green + blue => blue-green
  • blue + violet => blue-violet
  • violet + red => red-violet
So what do we do with these tertiary colors?

I think they look kind of playful.  Why not get out a piece of paper and let the tertiary colors play together.

I used tertiary colors for this week’s perspective drawings.

Day 51: watercolor texture


Let's explore  8 Ways to Add Watercolor Texture by Dr Oto Kano (18 minutes, 159K views).  I've listed the extra materials you'll need below.

I did the 8 ways and I learned a lot. 

On my water spray, the drops worked but the water spray didn't. My spray was too fine. I needed a spatter instead of a mist.  I used the bottom to experiment with watercolor pencils.

The salt worked great.  I could see this technique used to create a creature with matted fur or a coral bed or trees from above.

The watercolor pencils I used (Derwent Inktense) didn't spread as much as I thought they would so I tried the regular Derwent watercolor pencils on the water spray card. One line spread more, but the other line didn’t. I'll need to experiment with a different brand.

The Frisket worked well.  I also tore up masking tape to make the two white spots near the bottom. Oto did another video, 8 Watercolor Resist Techniques (28 minutes), if you want to learn more about resist techniques.

The plastic wrap worked great. I could see a character wearing a cloak with this design; or a tree with this bark texture.

The credit card was fun to work with, especially after I cut a small piece off the card.  I could see creating all kinds of bug possibilities, or ghostly creatures.

The tissue paper worked okay for me.  I was hoping to get more contrast.  I think my problem is the color I used was a staining color.

The palette knife and scraper worked okay but would have been better if I had waited for the paint to be completely dry.

Like I said, a lot of learnings! I think I learn more from my disappointments than from my successes.

Here is the extra Materials you'll need for your watercolor texture explorations:
  • watercolor paper
  • salt
  • watercolor pencil (many manufacturers including Prismacolor, Derwent, Faber-Castell, Crayola)
  • plastic wrap (a.k.a. cling film in the UK)
  • sprayer filled with water
  • frisket
  • cup of water with couple drops of liquid soap
  • NOTE: if you want to skip the ads in these videos, do the following:
    • make a note of where you are (minute 7:15)
    • use the YouTube controls to fast forward (this takes you to the next video
    • use your browser to go back once (this takes you to the beginning of the video you were watching)
    • use your mouse to move the video progress to a little past where you were
  • tissue paper (a.k.a. kleenex)
  • palette knife
  • exacto knife (to be safe, it's best to have an adult with you when you're using sharp tools)
  • an old credit card or used gift card or stiff plastic with straight edge


Sunday, May 21, 2023

100 Days of Drawing (Week 6)

This week's drawings

This week we draw cartoons, first doing some character design sketches then exploring emotions and finally using ‘the bean’ to draw the body. 

We begin to formally learn perspective using the single vanishing point to draw the inside of a room.

We’ll draw a tree using our sphere and cylinder skills.

We continue our color study with tints and shades and continue our texture study learning the difference between real texture and implied texture.

  • Day 38: trees
  • Day 39: character design
  • Day 40: a room in one-point perspective
  • Day 41: emotional cartoon faces
  • Day 42: the cartoon body
  • Day 43: tints and shades
  • Day 44: texture: actual/real/tactile vis implied/visual

Materials:

  • pencil
  • eraser
  • paper (printer paper, notebook, etc)
  • colors (colored pencils, crayons, watercolor, etc)
  • alternatives to the above: smart phone or tablet drawing app

Day 38: trees


Starting with the tree trunk, Mark Kistler anchors his tree with the roots before adding 'balls' of leaves.  His step by step instructions begin on page 163 of his book:
 you can draw in 30 days

Here is his 19 minute video showing how to draw the tree:
 How to draw trees with roots: Day 21

And here is my short video:


Day 39: character design


Tom Bancroft in four pages of Creating Characters With Personality guides us through creating a character.  We start with a basic shape (circle, triangle, square, rectangle) to create a face and head. He than uses the basic shapes to make various character bodies. Finally he gives an example of breaking down a character into simple shapes so that you can manipulate the shapes to draw your character moving around in your imagination.

In Cartoon Character Design for Beginners (7 minutes, 1.7M views) we get to watch Christopher Hart design an appealing character.

Day 40: a room in one-point perspective


Mark starts with a square which be ones the far wall of the room's interior. He places the vanishing point at the center of the square and makes lines through the vanishing point and the corners of the square.  These lines define the corners of the room. He furnishes the room using lines through the vanishing point and vertical lines to create shapes on or through the "walls". For step-by-step instructions, go to page 171 of Mark's you can draw in 30 days

Watch Circle Line Art School's How to draw a room on one point perspective: Day 22. It's a 10 minute video which has you drawing the horizon and a vanishing point on the horizon. From there you draw the room, add windows and a door.  You then furnish the room with a table and items on the table. To further your illusion, you provide shadows made by the light from the side window.

Sadly, I didn’t add shadows or shading so my table, chair, and man are flat and seem to float a bit:


Day 41: emotional cartoon faces


Now that you have created a character, let's enliven your character with emotions. I suggest that you get a piece of paper and divide it up to give yourself drawing areas where you can create emotions and label them.  I divided my paper into 18 spaces and drew a face that was:
  • happy
  • sad
  • angry
  • surprised 
  • bored
  • ashamed
  • annoyed
  • confused
  • thoughtful
  • jealous
  • tired
  • embarrassed
  • confident
Here are two videos that illustrate drawing cartoon emotions:
Here is my Procreate generated video of drawing emotions:


Day 42: the cartoon body


Now that you know how to draw cartoon characters from head to toe, let's start learning how to draw the human bean : ) Proko shows us How to simplify the motion of the torso (11 minutes, 3.6M views) by using "The Bean".  He demonstrates how The Bean is based on the human trunk (chest and pelvic) and how it helps us visualize its twists and turns.

In How to Draw Better Bodies - Part 1 by Brookes Eggleston (7 minutes, 243K views) you'll see how to quickly sketch 9 basic body shapes in 7 minutes! I encourage you to use The Bean when you do your sketches.

Day 43: tints and shades


You make a tint by adding white to a color.

You make a shade by adding black to a color.

By adding black to white you make shades of gray. You can create a value scale by starting with white and adding black, bit by bit, to make darker and darker shades of gray until you get to black.

Tints and Shades by School of Yule (2 minutes 68K views) shows you an examples of making a value scale from white to black and then a value scale in blue.

If you do a painting using only tints and shades of one color, it's called a monochromatic painting.  The drawing I did has a monochrome man using tints and shades of red. 

This video, The Value Song by Scratch Garden (3 minutes 1.4M views), gives you a nice overview of tints and shades. 

Here is my video of drawing an artist measuring his subject:


Day 44: texture: actual/real/tactile vrs implied/visual


My drawing implies the texture of a fuzzy dog, a feathery bird, a man with hair, cloth clothes, and leather shoes.

Here are 4 short videos that will imprint texture onto your understanding:
Here is my video of drawing a my cousin Bruce completing the Washington DC 75 mile GORUCK event with his dog and toucan:


Saturday, May 13, 2023

100 Days of Drawing (Week 5)

How to Use These Posts

There are a number of valuable ways to use these posts:
  1. Read no further than the title and just DRAW.
  2. Scroll through the images and DRAW one that appeals to you.
  3. Scroll through the images, pick one that you want to learn to draw, click one of the ‘How-To’ links, and DRAW.
  4. Read the blurb, click on a ‘How-To’ link, and DRAW each of the 100 drawings
These posts are only valuable if they influence you to DRAW.

This Week’s Drawings

This week we’ll draw flags, scrolls, cups, and volcanoes that all use the cylinder as their foundation. 

Using straight lines, we’ll draw pyramids. 

Continuing our manga/cartoon plan, we’ll draw cartoon hands and feet. We’ll round off the week with a color theory segment on secondary colors.

Materials:
  • pencil
  • eraser
  • paper (printer paper, notebook, etc)
  • colors (colored pencils, crayons, watercolor, etc)
  • alternatives to the above: smart phone or tablet drawing app

Day 31: pyramids


Mark show you how to draw a pyramid in Lesson 19 of You can draw in 30 days

I used perspective (a concept that Mark covers in later lessons) to draw 4 pyramids.

In his YouTube, Let's draw some floating pyramids: Day 19, Mark shows you how to draw multiple views of a pyramid.

Day 32: rippling flags.


Using what you've learned drawing cylinders, Mark leads you through a process of drawing a rippling flag.  He notes that doing this drawing uses the following tools to create the illusion of three dimensions:
  • Foreshortening
  • Overlapping
  • Size
  • Shading
  • Placement
His step-by-step lesson starts on page 143 of You can draw in 30 days. Here is Mark's YouTube of drawing: Foreshortened Flapping Flags: Day 17


Day 33: the scroll


The scroll is also made using the skills you learned making cylinders.  Mark's 5 step guidance begins on page 149 of You can draw in 30 days.  Let's Draw a Flying Carpet and More Scrolls: Day 18 is Mark's YouTube that includes scrolls.


Day 34: volcanoes, craters, and a cup of coffee


We're back to using cylinders to create our 3D objects.  In this case you'll be making cups or volcanoes or both. Mark instructions begin on page 157 of You can draw in 30 daysHere is his YouTube: Let's draw a cool coffee mug: Day 20


Day 35: the hand


Hands are marvelous.  They are part of the Dynamic Duo: Hand and Eye. Training the Dynamic Duo to work with your imagination is our goal!

Hands are difficult to draw, but Proko takes us through his method for drawing hands from your IMAGINATION (13 minutes, 430K views). And since one of the best parts about drawing is cartoons, Proko shows us how to draw mickey mouse hands, cartoon hands, and comic hands in his video: How to Draw Cartoon Hands (12 minutes, 3M views).

The thing to do is just draw.  To get you started I did a selection of Mickey Mouse hands and cartoon hands. 


Day 36: the foot


To get us started, How to Draw Feet and Shoes - Cartooning 101 by BeeJayDeL teaches us to draw 5 pair of cartoon feet.

Here is a video showing how to draw 12 views of the foot: How to Draw Cartoon Feet by All Sketch Art Tutorials (9 minutes, 4.7K views)

Day 37: secondary colors


Mixing the primary colors produces the secondary colors:
  • Red + Yellow => Orange
  • Yellow + Blue => Green 
  • Blue + Red => Purple
Make a drawing and color it using the secondary colors. Here is an example drawing based on the title of a 1958 song by Sheb Wooley. Sometimes a song or a poem can be just the inspiration you need to DRAW.


Sunday, May 7, 2023

100 Days of Drawing (Week 4)

Elements of Visual Art

An element is an essential ingredient that is used to make up more complex things. In art you normally start off with a line.  By putting various lines together you can create a shape. By adding value, that is shading, to your shape you create form.  By placing forms and shapes in configurations where they overlap and have different sizes, you create space.
(Links above are to Art fundamentals: theory and practice  by Otto G Ocvirk, Robert E Stinson, Philip R Wigg, Robert O Bone, David L Cayton.)

In the first four weeks we've been working with Line, Shape, Value, and Form. We have also touched on Space but will address it more formally when we start learning how to incorporate perspective in the next couple of weeks.

This week's drawings

This week I'll start our lessons on Color by introducing the primary colors.

I've also included an introduction to Texture this week.

Materials:
  • pencil
  • eraser
  • paper (printer paper, notebook, etc)
  • pen
  • colors (colored pencils, crayons, watercolor, etc)
  • alternatives to the above: smart phone or tablet drawing app

Day 23: the lilly


Lesson 14 starts on page 123 of Mark Kistler's you can draw in 30 days.  He uses gentle S curves and tapering lines to create the lovely lilly.

Mark suggests looking at the flowers in Graeme Base's Animalia. Luckily it's available in Internet Archives. Graeme is quite creative and I think that his Uno's Garden has more interesting plants to enjoy. His The Eleventh Hour: a curious mystery provides a visual carnival ride for your amusement.

Mark also recommends Michel Gagné's work. His The Saga of Rex is available in the Internet Archives.

From Arcu's Art World: How to Draw Calla Lillies: Day 14


Day 24: advanced-level houses


Lesson 13 starts on page 117 of Mark Kistler's you can draw in 30 days. Mark leads you through the process of drawing an courtyard-style house (L shaped).

.


Day 25: contour tubes


Lesson 15 starts on page 129 of Mark Kistler's you can draw in 30 days . Drawing a line for the base, a foreshortened circle for the opening, a line for the top, and a curve for the end you create a elongated shape. You then add contours (curved lines) along the tube to turn the shape into a form and create the illusion of a tube.


Day 26: the wave


Mark continues his use of the tube to teach you how to draw a wave. See Lesson 16 starting on page 137 of  Mark Kistler's you can draw in 30 days for his step-by-step tutorial.

Here are two video tutorials:
For my drawing, I used Jeremy Bishop's Sea Spray and Waves, a photo he shared on Unsplash.


Day 27: body


I tried to draw a body from imagination and decided I needed to do some practice exercises first.  Luckily Burne Hogarth has addressed figure invention in Dynamic Figure Drawing. Burne's drawing style is advanced, but you can simplify it as needed to make it work. For example, use stick figures to study how the body joints work, or use a  manikin to do your study. Here are links to get you started working with a manikin:
Leonardo Pereznieto has two videos I recommend.  In How to Draw the Figure from Imagination Part 1  (11 minutes, 5.2M views) Leonardo demonstrates using an enhanced stick figure (a stick figure with rib cage and pelvic) to sketch figures in various poses. He choses one of the poses to draw to completion.

In How to Draw the Figure from Imagination Part 2  (14 minutes, 1.3M views), Leonardo draws 7 poses started with the enhanced stick figure and adding muscles and flesh to complete each.


Day 28: primary colors


In drawing we use graphite or charcoal or chalk or ink to make marks on paper. Eventually we learn to use a brush loaded with pigmented liquid to make our marks. In a sense, making marks on paper is made by leaving trails of pigment or splashes of pigment soup.  Traditional Art Color Theory is about how these pigments mix to make colors. The primary colors are the ones that are mixed to make the other colors. They are Red, Yellow, and Blue.  Sometimes you'll see an acronym for them: RYB.

I'm listening to a book about Livingstone's search for the source of the Nile. Most of the Nile's water comes from the Blue Nile which got me to think about rivers that are 'primary colors': Red River in New Mexico, Yellow River in China, and the Blue Nile in Africa.  This was leading me to do a cartoon of the three rivers,  but since yesterday was the running of the Kentucky Derby, I decided to do a primary color design honoring the fastest horse ever to race in the Derby : )


Day 29: texture


As you know,  Form is a word that we use to name the visual illusion of three dimensions our drawings create on a two dimensional surface. Texture is the name we use for the tactile illusion we create with our drawings. We encourage our viewers to run the fingers in their eyes along the surfaces we draw. Using a smooth line of ink, we can create a smooth surface; using charcoal, we can create a rough surface. 

For our drawing today let's try to create the following surfaces:
  • smooth
  • rough
  • soft
  • hard
  • sticky 
And here are four video tutorials for drawing texture using various media:

Our focus here has been how to create the illusion of texture.  Further down the road we'll learn techniques for creating texture in your art.  3 easy ways to add watercolor textures to your painting gives you a 30 second glimpse of what I'm talking about.


Day 30: the head


When I first learned to draw human heads, I remembered that the ears extended from the eyebrows to the bottom of the nose.  I also remembered that the eyes are the width of the nose and start even with the wings of the nostrils. The Loomis Method that Proko walks you through will give you guidance for creating more human-like faces.